In this tutorial, we will explore the step-by-step process of installing Selenium. As you are aware, Selenium supports multiple programming languages for writing test scripts. Among these, Python and Java are the most popular choices due to their ease of use and robust libraries. In this guide, we’ll provide step-by-step instructions on how to install Selenium for both Python and Java.

Although Selenium supports the use of various prominent programming languages for development, our tutorial series will exclusively focus on Python as the primary language for Selenium.
Python is the most popular language among Selenium developers.
Installing Python and Setting Up Selenium for Test Automation
Step 1: Install Python
1. Download Python:
- Visit the official Python Downloads page.
- Download the latest version suitable for your operating system (Windows, macOS, or Linux). The site will automatically detect your OS and offer the appropriate version for download.
2. Install Python:
- Run the downloaded installer.
- Make sure to check the box that says
Add python.exe to PATH. This makes it easier to run Python from the command line.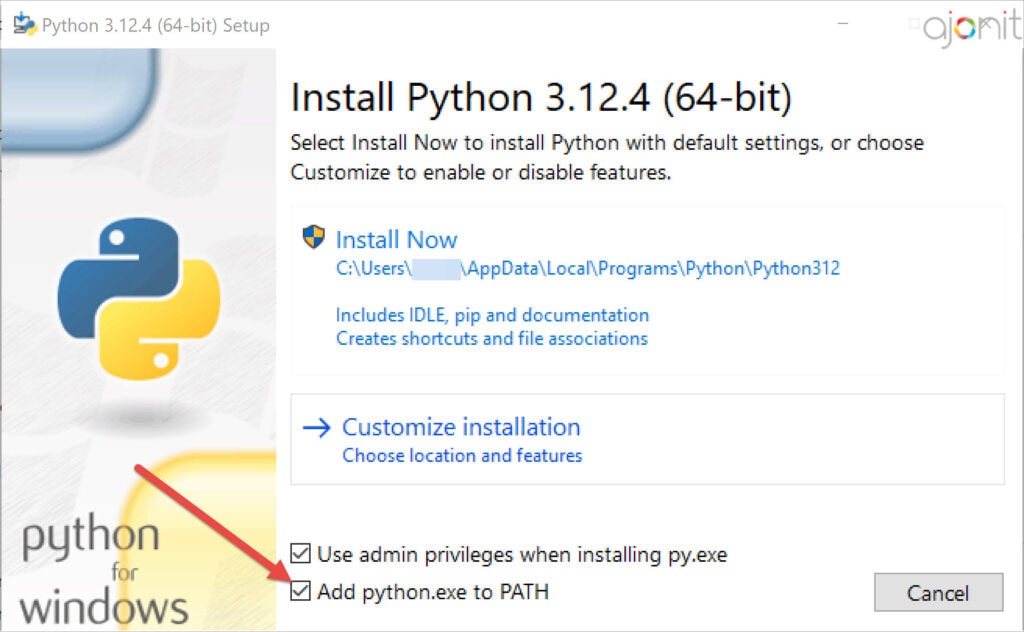
- Follow the instructions in the setup wizard to complete the installation.
The PATH is an environment variable in your operating system that specifies directories where executable programs are located. Adding Python to PATH allows you to run Python from any command line prompt without needing to specify its full path. Learn more about PATH variables.
3. In case you missed checking Add python.exe to PATH above.
- Locate your Python installation directory. By default, Python is installed in this directory in Windows:
C:\Users\<Your_Username>\AppData\Local\Programs\Python\PythonXX - Press
Win+Rand entersysdm.cplin the Run dialog box. - Go to Advanced tab, click on the
Environment Variablesbutton. - In the
System Variablessection, select thePathvariable and clickEdit. - Click
Newand add the path to your Python directoryC:\Users\<Your_Username>\AppData\Local\Programs\Python\PythonXX - Click
OKon all windows to save the changes.
Step 2: Verify Python Installation
- On Windows: Open Command Prompt.
Win+Rand typecmd. - Check Python Version:
- Type
python --versionand press Enter.
- You should see the installed version of Python displayed.
Step 3: Install pip (Python Package Installer)
- Pip, a package manager, is usually installed by default with Python. To check if it’s installed, type
pip --versionin the command line and press Enter. - If pip is not installed, you can download and install it by following these instructions.
What is a Package Manager? Why is pip required?
Package managers are tools used by developers to easily download, install, and manage external libraries or modules, also known as “packages,” that their projects depend on. Instead of manually downloading and installing each package you need, a package manager automates this process for you. Different programming languages have different package managers, like pip for Python; Maven for Java; npm for JavaScript; Composer for PHP.
In this case, we will use pip , a package manager for Python, to install Selenium.
Step 4: Install Selenium
Open Command Line (or Terminal) and Install Selenium using pip:
- Type
pip install seleniumand press Enter.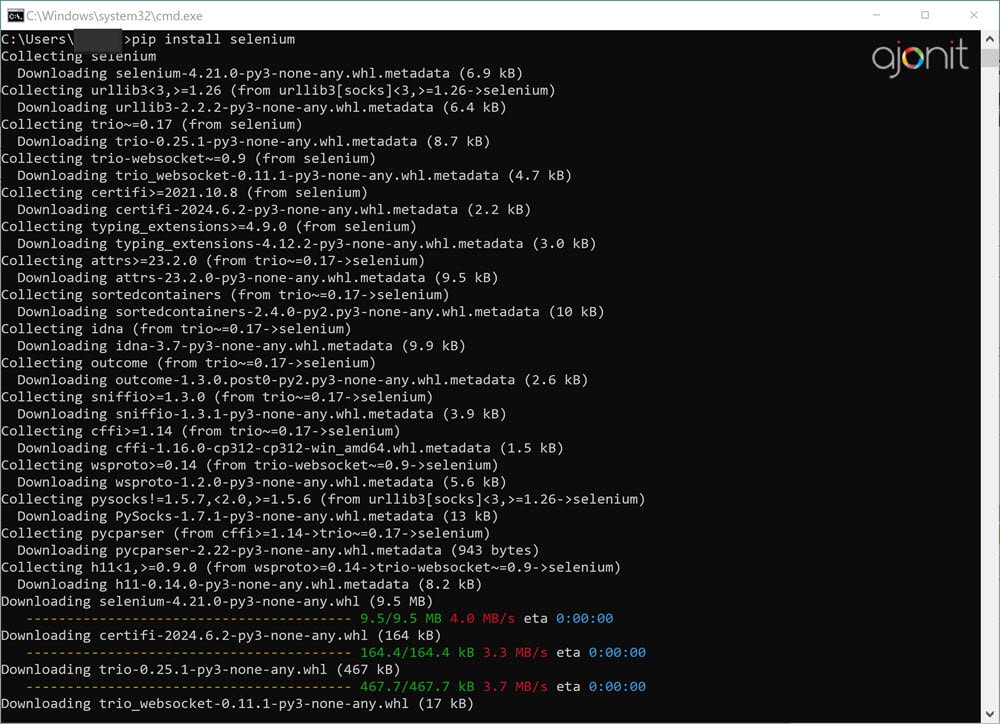
- Wait for the installation to complete. Yeah, it’s that simple!
We have successfully installed Python and Selenium on our system.
If you’re working on Python, feel free to skip the rest of the article. In the next section we will explain how to install Java.
Installing Java and Setting Up Selenium for Test Automation
Now let us install Java and Eclipse as the editor. We will also incorporate Maven, a build automation tool, to streamline the installation process.
Do not be intimidated by terms like Eclipse and Maven if you are new to the world of automation or development. These are helpful tools that make the process of writing code and managing dependencies much simpler. Eclipse is the application where you write your code, while Maven takes care of automatically downloading and integrating libraries for your software application. This saves time and reduces the risk of errors caused by manual management of dependencies.
Step 1: Download and Install Java
Before we start with Selenium, we need to ensure that Java is installed on our system. Java can be downloaded from the official website. Follow the steps below to install Java:
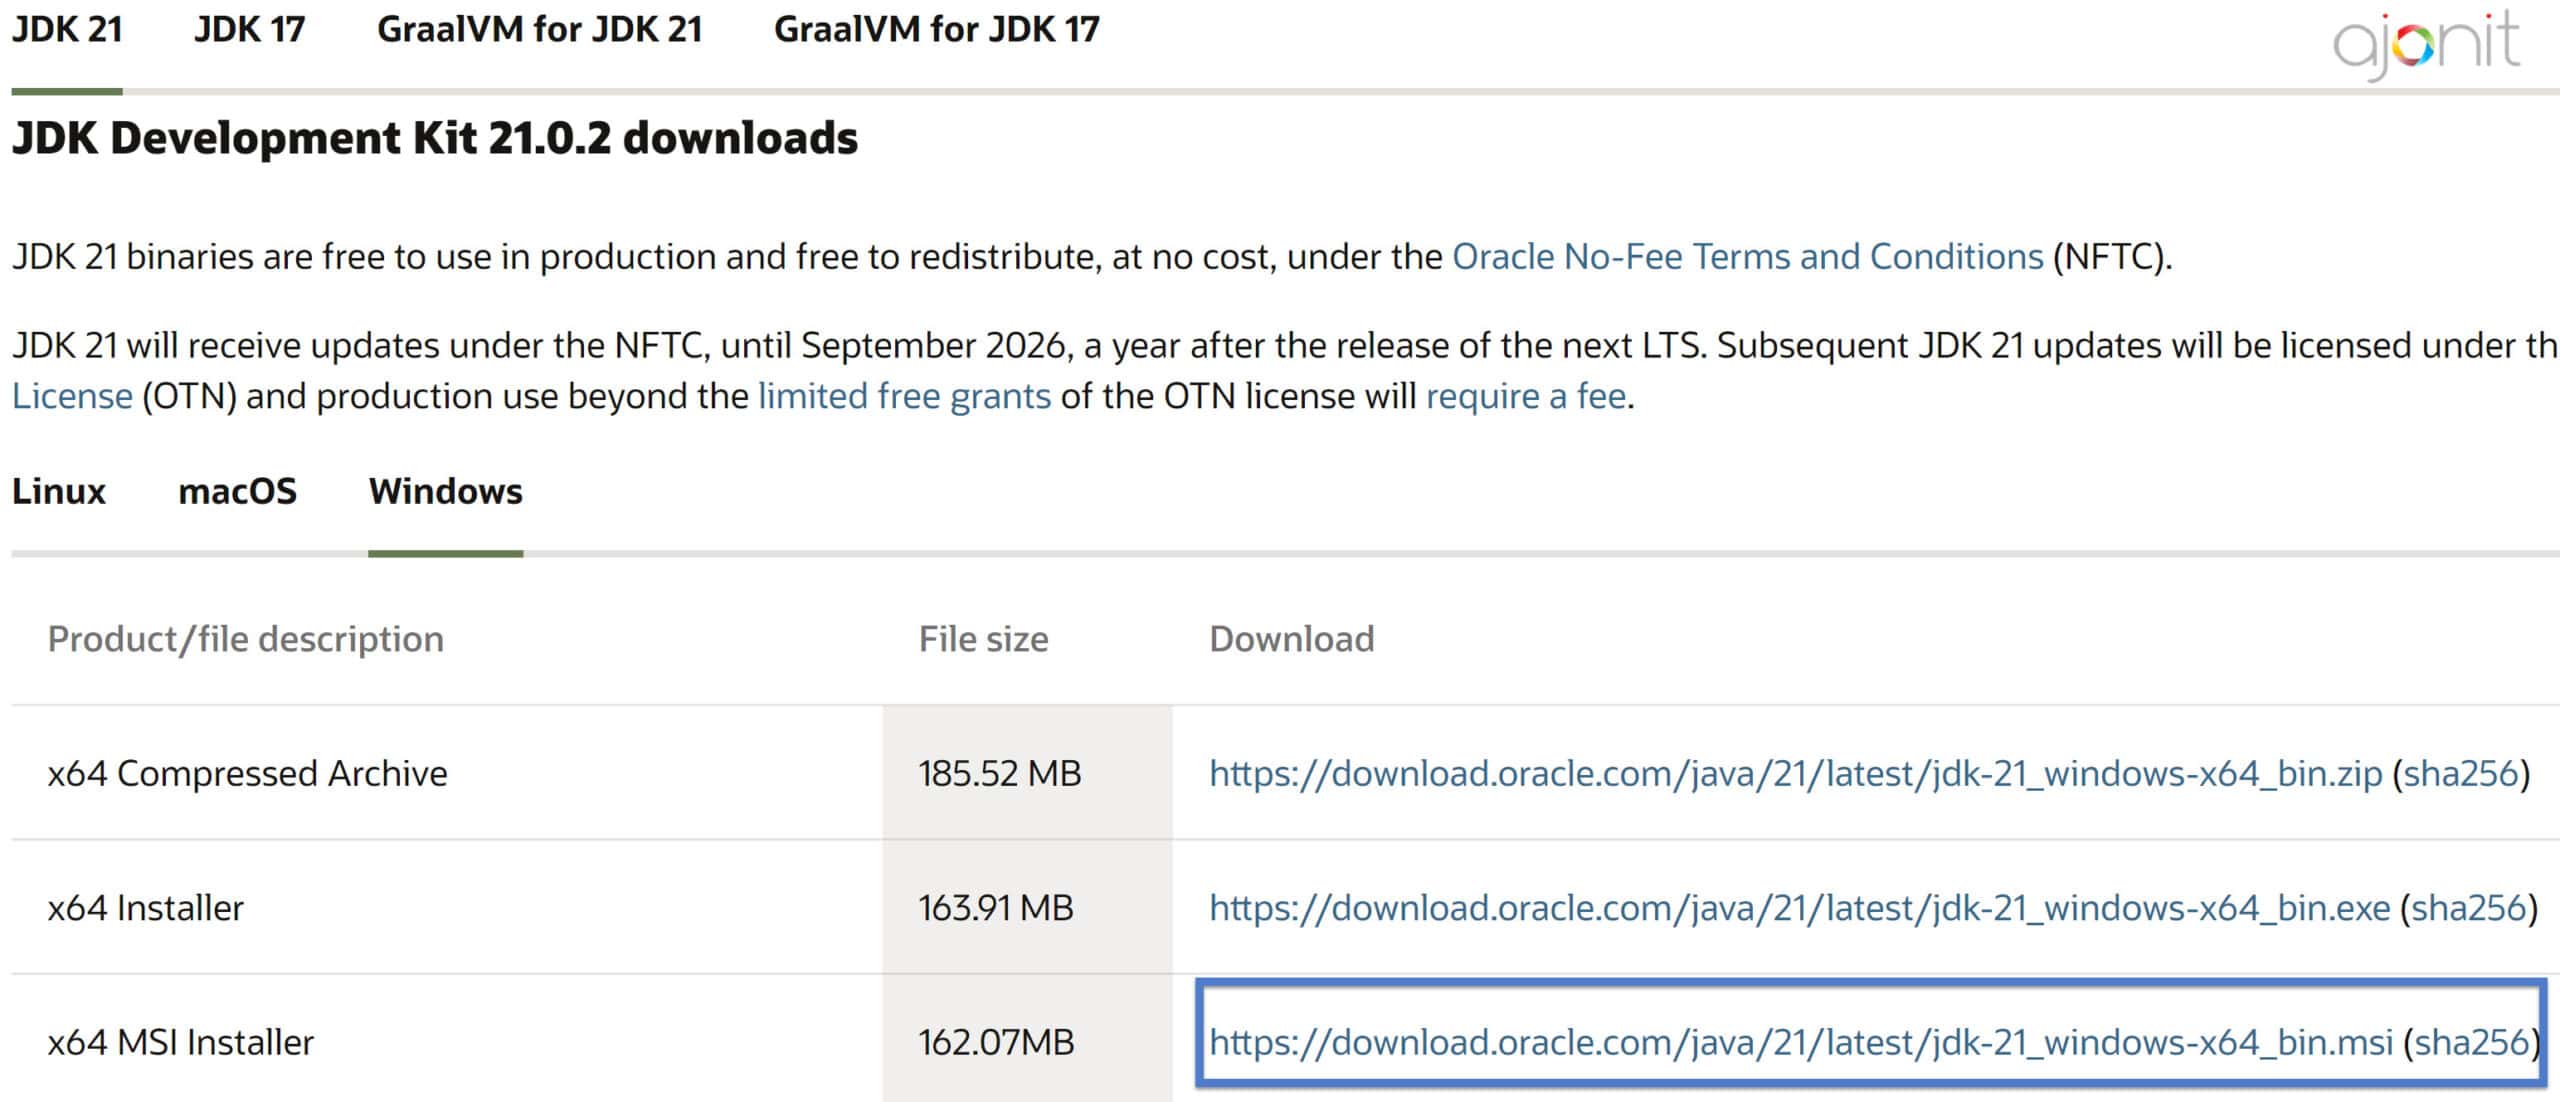
- Visit the official Java website. Unless you have a specific version requirement, go to JDK 21 tab.
- Choose the appropriate installer for your operating system and download it.
For Windows, we chosex64 MSI Installer. - Follow the installation wizard to install Java on your system.
As of this tutorial, there were two long term support (LTS) release versions available JDK 21 and JDK 17, we decided to go with the most recent LTS release.
Step 2: Set the JAVA_HOME variable
The JAVA_HOME variable is required to be set in Windows because it tells the operating system where to find the Java Development Kit (JDK) installation directory.
Many Java-based applications and development tools like Eclipse and Maven require the JDK to be installed on the system, and they use the JAVA_HOME environment variable to locate the JDK installation directory. Without this variable set, these applications and tools may not be able to function properly, or they may not even be able to start at all. Check the video below to understand how to set JAVA_HOME variable.
Basically under environment variables, you need to set the JAVA_HOME path to the JDK installation directory which in our case is C:\Program Files\Java\jdk-17
Step 3: Download and Install Eclipse
Eclipse is a popular open-source integrated development environment (IDE) for Java. It provides a set of tools to develop and debug Java applications. Follow the steps below to download and install Eclipse:

- Visit the official Eclipse website.
- Choose the appropriate Eclipse version for your operating system and download it.
- Launch Eclipse installer by double-clicking on the
eclipse.exefile. Choose Eclipse IDE for Java developers and follow the installation wizard.
Step 4: Create a new Maven Project
Maven is a popular build automation tool used in Java projects. It provides a set of plugins to automate the build process and manage project dependencies. Follow the steps below to create a new Maven project:
- Launch Eclipse and select ‘File’ -> ‘New’ -> ‘Maven Project’ from the menu.
- Select the checkbox ‘Create a simple project (skip archetype selection)’ and click ‘Next’.
- Enter the Group Id (say com.ajonit) , Artifact Id (say SeleniumCourse), and Version for your project.
- Click ‘Finish’ to create the new Maven project.
The Group ID is a unique identifier for a group or organization that is responsible for the project. It is typically written in reverse domain name notation, such as com.example or org.apache. The purpose of the Group ID is to ensure that the project's dependencies do not conflict with other projects that have the same name.
The Artifact ID is a unique identifier for a specific project within the group or organization. It is typically the name of the project, such as myproject or spring-core, and is used to differentiate between different projects within the same group. The Artifact ID is used to generate the name of the project's JAR or WAR file.
Together, the Group ID and Artifact ID form a unique identifier for a project, which is used to specify the project's dependencies in the Maven configuration file (pom.xml). When you specify a dependency in the pom.xml file, you use the Group ID and Artifact ID to identify the required library or module. Maven then uses this information to download the required dependencies from a repository and include them in the project's build process.
Step 5: Add Selenium Dependency
A Selenium dependency refers to a library or module that is required to integrate Selenium into your project.
Now that we have created a new Maven project, we need to add the Selenium dependency to our project. Follow the steps below to add the Selenium dependency:
- Go to Selenium Maven repository and select the latest version.

 The code in the red box above shows the Selenium dependency. Open your project’s pom.xml file and add the Selenium dependency to it just after the close of
 <version>tag. The code would look like this.
<dependencies> <!-- https://mvnrepository.com/artifact/org.seleniumhq.selenium/selenium-java --> <dependency> <groupId>org.seleniumhq.selenium</groupId> <artifactId>selenium-java</artifactId> <version>4.8.1</version> </dependency> </dependencies> </pre> [sc name="contentboxyellow" content="If you take a closer look, you will notice that we have nested <code class="" data-line=""><dependency> ... </dependency> elements inside the<dependencies> ...</dependencies>element. The reason for this is that, just like with Selenium, there are several other dependencies that can be downloaded and added to the project. For example, Selenium Grid is a tool for running Selenium tests on multiple machines in parallel, and TestNG is a testing framework that can be used to write and run Selenium tests. By including these dependencies within the<dependencies>element, Maven will automatically download and manage them for us, making it easier to keep track of all the dependencies needed for the project to function properly. "][/sc]Congratulations, you have successfully installed Selenium. You are all set to write your first Selenium program.
In the next tutorial, we will learn all about Selenium WebDriver, its history, how to install it, and more! Subscribe to our Selenium tutorials for free so that you don’t miss any future articles.